Windbender Installation
Honda GL1800 Goldwing
Download PDF Version
Cautions
Do not forget to stuff some rags in the black holes behind the mirrors before removing the mounting hardware for the windshield garnish.
Installation Instructions
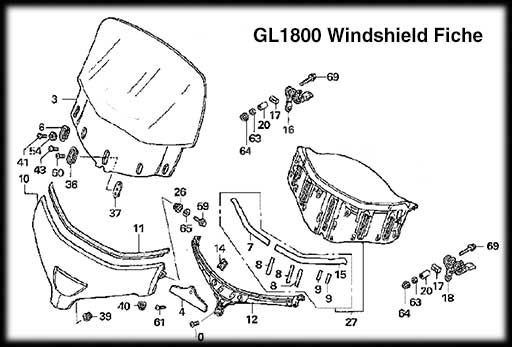
Refer to the parts fiche and photos.
- Release the mirror boots from the fairing. Swing the mirror forward to give access to the windshield mounting hardware.
- Pack a rag between the fairing and mirror below the bolt holding the windshield garnish. This will keep hardware from being deposited into the dark recess of the fairing.
- Using a 10 mm combination wrench, remove the left and right windshield garnish mounting bolts, washers and rubber grommets (#59, #65, #26, Red Arrow) that hold the windshield garnish (#10) to the windshield clamp bar (#12). Release the windshield garnish from its four grommets (#39, #40). Using a Phillips screwdriver, remove the fiber wind deflector located at the bottom of the windshield clamp (#4). Remove the bolt (#0) holding down the lower portion of the clamp with an 8 mm combination wrench. Remove the two nuts holding the windshield clamp to the clamp levers with a 10mm socket (#64, Green Arrow). Remove the four Phillips setting screws and oval mounting plates holding the windshield on (there are only two on later models - the two inside plates are non-existent). Remove the two 5mm hex socket setting bolts holding the center and final oval holding plate. Loosen but do not remove the Phillips screw from the center holding plate. Remove the windshield. Transfer the center oval mounting plate hardware (#36 and #37) from the windshield to the Windbender Base Unit.
- Honda uses rubber tape on the dash to protect(?) the stock windshield (group #27, parts #7 and #15). If your tape is distorted, you may either remove it or replace it (electrical tape works), but most people simply remove the old tape and clean the surface. You may also remove the thicker vertical rubber strips (group #27, parts #8 and #9), but it is okay to leave them in place if they are in good condition.
- Install the Windbender Base Unit reusing the original hardware. Reinstall the windshield clamp. You may reinstall the windshield garnish now or wait until after a test ride.
- With the Base Unit in the lowest position, slide the Top Shield rails into the Base rails. The Top Shield may need to be flexed slightly. Slide the Top Shield to its lowest position and engage both Locating Pins by turning them until they spring into place. If necessary, slide the Top Shield until the pins locate in the rail divots.
- Loosen the four #10x5/8 screws that hold the two rails on the Top Shield. Jiggle the Top Shield to allow the rails to self-center. Lightly tighten the four screws. If excess rattling between the brackets is noticed after setup, they can be tightened up by rotating them slightly; loosen the bottom screws on the top mounting rails and slide them toward each other and re-tighten. If further tightening is needed, follow the same procedure moving the top of the rails toward each other.
- Put four snap caps on the rail mounting screws and go for a ride.
Windbender Adjustment and Options Installation
Because no two rider/bike/gear combination is identical and everyone has different tolerances and expectations, we recommend that you adjust your Windbender (and add Options) in the following sequence. This sequence will help you find the most comfortable configuration for yourself and your passenger while allowing you to take full advantage of your Windbender capabilities.
Test your Windbender in its standard configuration before installing a Rake Kit or Electric Option.
Take your bike out for a ride starting at one of your “normal” slow speeds with the base and top shields in their lowest positions and note if you are able to get a slight breeze in your if that is one of your goals. You may also check to see how high air is flowing over the shield or your helmet at various speeds with a free hand to see how much you may need to raise the shield. Ride at different speeds raising the Top Shield one notch at a time to see where the air breaks and to see how tall it must be for your highest riding speed or passenger comfort. Raise the Base Unit if required. The goal is to find a range of heights that only require use of Windbender adjustment. It is must more friendly than the stock adjustment.
Please contact us if you experience any difficulty with installation or experience any problems with your kit.
If you cannot find a position that makes your ride considerably better than the stock windshield, you may want to try a different top shield or add a Rake Kit. If you need the convenience of adjusting your shield while riding, add our electric option after you have found the range of settings that works best.
Cleaning and Maintenance
Release the retaining pins in the adjustment rails and the top shield can be removed for easy cleaning. Use a clean, soft cloth and cleaners approved for acrylics (no ammonia). To maintain easy adjustment it is recommended to occasionally clean the rail sliding surfaces and coat them with wax or silicone spay.
If your Windbender gets scratched it can be polished. Polishing instructions are on our Maintenance Page