Farkle Shelf Installation
Honda GL1800, F6B
Download PDF Version
Cautions
If you are mounting the Farkle Shelf to a one piece windshield; complete step 4 while the shield is still on the bike and find the best fit
location for the shelf, then proceed to step 1.
Feel free to leave your windshield on the bike if you have strong clamps or help from a friend but, be careful not to run a drill bit into your dash!
Installation Instructions
- Remove the Windbender Base shield, or other windshield, from your bike
- Spread a large, clean, soft cloth (a bath towel works great) flat on your workbench and lay the removed shield front-face down on the towel.
- To avoid scratching the shield with your Farkle Shelf, cover the inside of the shield with masking tape at the. Farkle Shelf mounting tab locations.
- Cover the inside top-center of the shield with tape and make a mark at the center and one inch down from the top of the base shield. This will be the alignment point for the top center of the Farkle Shelf. The Farkle Shelf is designed specifically for this location but, you may use another as required.
- Gather a pencil or Sharpie and you may want to get out your large set of squeeze clamps for the next steps.
- Place the top center of the Farkle Shelf on the center mark you made on the inside of the windshield. The mounting tabs should be resting on the masking tape you laid down a few minutes ago. Using a tape measure, ruler, or your best guess (finger-tips are really a pretty darn good gauge), center the Farkle Shelf on the shield right to left and locate it parallel to the bottom of the shield.
- While holding the Farkle Shelf firmly against the windshield, trace each of the six mounting holes onto the tape. This is a good time to use those squeeze clamps.
- Set aside the Farkle Shelf and mark the center of each trace.
- Using an old-school, 1/4" or 5/16" wood spade bit drill six holes on your marks.
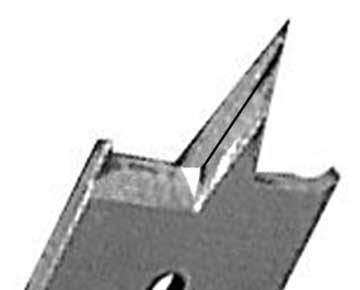
WARNING: see photos for bit styles to avoid – some types will split acrylic.
NOTE: A spade bit will make a nice clean hole in the acrylic and its sharp point makes it easy to center the bit on your marks without drilling a pilot hole. Twist bits will work best if you start small but, can more easily chip the acrylic. Stepped bits work well too but, are harder to center. Do not attempt to use a center punch. - Remove the tape from your windshield and clean up any residue.
- On two of the 1" 1/4-20 stainless steel machine screws, place a powder-coated 12ga washer then one round rubber cushion. The rubber cushion has a snug fit on purpose. You may find it easier to thread the screws through the cushion. Do the same thing with the remaining four screws, two 12ga oval backing plates and matching rubber cushions.
- Insert the assembled screws and cushion into the corresponding mounting holes from the front of the shield. Slide or thread the remaining rubber cushions onto the bolts from the inside of the shield to hold all the screws in place.
- Lay the shield face down on your towel and slide your Farkle Shelf onto the protruding screws.
- Thread a stainless steel lock-nut over a 1/4" stainless flat washer on each screw. Hold the screws in place with a Phillips screwdriver and tighten the nuts until the screw threads pass the nylon are just past flush with the top of the nuts. Note: if you are using a 1/8" thick Windshield, the screw threads should protrude approximately 1/16” past the top of the nut.
- Reinstall the shield. Note: if you are not using a Windbender you may want to install all of your Farkles on the Shelf before you attach the shelf to the shield because your windshield may be in the way of drilling the shelf.
HAVE FUN FARKLEIZING!
WARNING: Our Farkle Shelf is bounce free
when mounted properly. However, mounting heavy gadgets beyond the back edge of the shelf can potentially cause the shelf and windshield to bounce on rough roads.
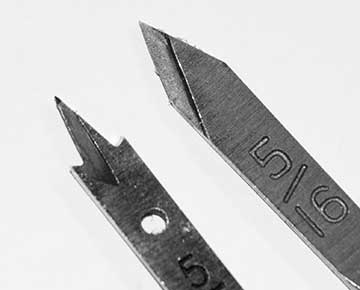

These 5/16 standard spade bits are okay to use. Bits with a twist tip or a v
groove in the cutting edge will explode acrylic.